Why Banana Split Pie Is the Ultimate Treat
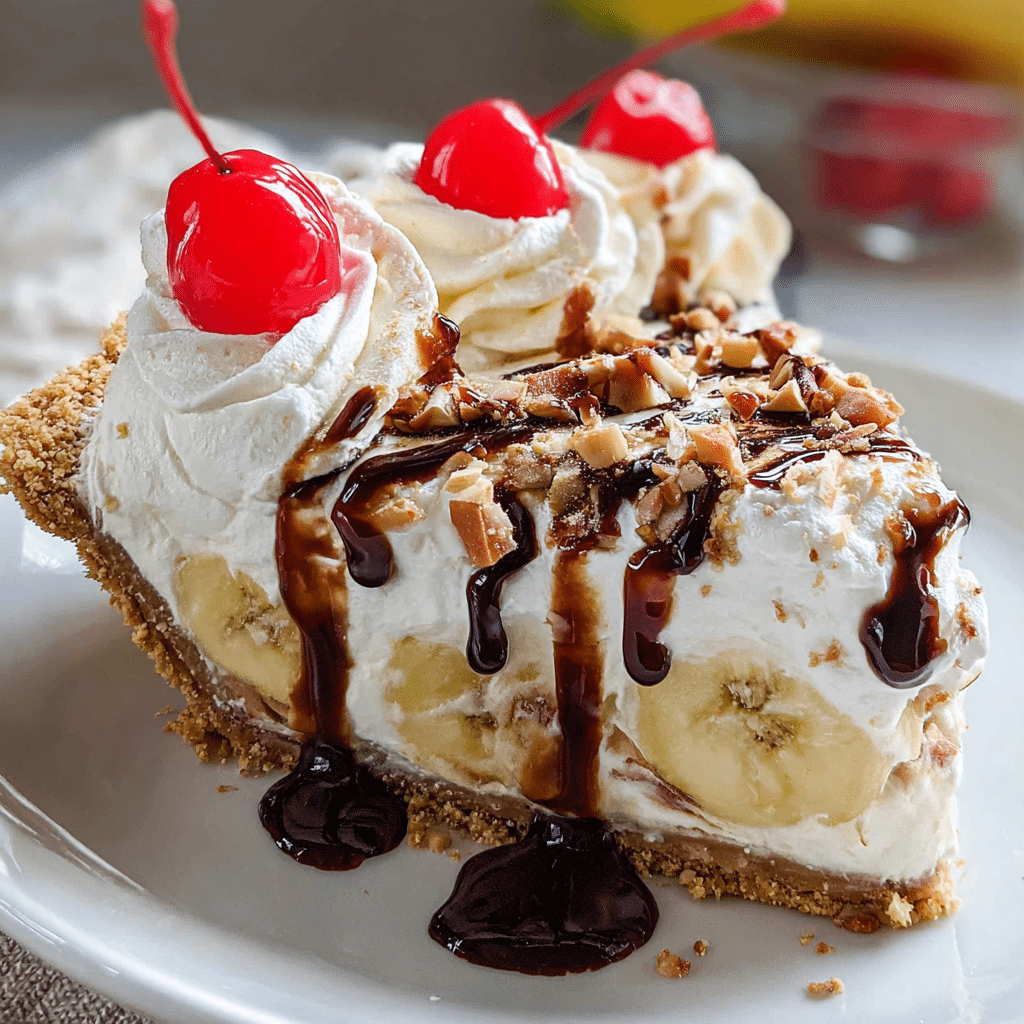
Discover the creamy, sweet delight of Banana Split Pie, a luscious dessert that perfectly combines ripe bananas, rich chocolate, and fluffy whipped cream for any occasion! This irresistible treat captures all the flavors of a classic banana split in a convenient pie form, making it a crowd-pleaser that’s as fun to make as it is to eat.
Why You’ll Love This Recipe
- Classic Flavor Combination: All your favorite banana split ingredients come together in one easy, delicious pie.
- Perfectly Creamy Texture: Smooth banana layers and velvety whipped cream create a dreamy mouthfeel.
- Simple to Prepare: Minimal hands-on time means you can whip up this dessert quickly without sacrificing flavor.
- Great for Any Occasion: Whether a family gathering or a casual summer treat, this pie fits right in.
- Customizable: Adapt the toppings or crust easily to suit your taste or dietary preferences.
Ingredients You’ll Need
The magic of Banana Split Pie lies in a handful of simple, yet essential ingredients, each bringing its own flavor and texture to the dish. From ripe bananas for natural sweetness to rich chocolate for depth, and fluffy whipped cream to balance it all, every component plays a starring role.
- Bananas: Use ripe bananas for maximum sweetness and natural creaminess in the filling.
- Chocolate: Smooth chocolate, whether chips or melted, adds the perfect bittersweet balance.
- Whipped Cream: Light and airy, whipped cream adds a luxurious, fluffy texture on top.
- Pie Crust: A classic graham cracker or cookie crust provides a crunchy foundation for the pie.
- Sugar: A touch of sugar enhances the natural flavors without overpowering.
- Vanilla Extract: Adds warmth and depth to the creamy filling.
Variations for Banana Split Pie
One of the best things about this Banana Split Pie recipe is how easy it is to tweak and personalize. Whether you want to sneak in some extra fruit, cater to dietary needs, or simply switch up the flavors, there’s a variation to suit every craving.
- Nutty Twist: Add chopped nuts like pecans or walnuts for crunch and nutty flavor.
- Chocolate Lovers’ Version: Use a double chocolate crust and add chocolate chunks inside for extra indulgence.
- Vegan Adaptation: Substitute coconut whipped cream and a plant-based crust for a dairy-free option.
- Fruit Medley: Include strawberries or pineapple chunks to brighten and diversify the fruity flavors.
- Low-Sugar Option: Use natural sweeteners like honey or maple syrup to reduce refined sugar.

How to Make Banana Split Pie
Step 1: Prepare the Crust
Start by mixing crushed graham crackers or cookie crumbs with melted butter and a bit of sugar, then press the mixture firmly into your pie pan to create an even, solid base. Chill it in the fridge to set while you prepare the filling.
Step 2: Layer the Bananas
Slice ripe bananas evenly and arrange them in a single layer over the chilled crust. This fresh fruit layer forms the heart of your Banana Split Pie.
Step 3: Make the Creamy Filling
Whip together heavy cream (or coconut cream for a vegan version) with vanilla extract and sugar until soft peaks form. Fold in melted chocolate carefully to create a smooth, luxurious filling.
Step 4: Assemble the Pie
Pour the creamy chocolate filling over the banana layer and spread it evenly with a spatula. Make sure each slice will have a perfect balance of banana and cream.
Step 5: Add Whipped Cream Topping
Generously spread or pipe freshly whipped cream over the top, adding extra dollops as desired for that classic banana split look. Chill for at least a few hours or overnight to let the flavors meld.
Step 6: Garnish and Serve
Just before serving, add your favorite toppings such as maraschino cherries, chocolate shavings, or nuts to elevate your Banana Split Pie to irresistible heights.
Pro Tips for Making Banana Split Pie
- Choose Ripe Bananas: The sweeter and softer the bananas, the more flavorful the pie.
- Chill Thoroughly: Allow the pie to chill well so layers set properly and flavors meld.
- Use Fresh Whipped Cream: For the best texture and flavor, whip cream fresh instead of using canned toppings.
- Prevent Browning: Brush the banana slices with a little lemon juice to keep them from discoloring.
- Sweetness Balance: Taste the filling before assembling to adjust sugar levels perfectly.
How to Serve Banana Split Pie
Garnishes
Top with bright maraschino cherries, a dusting of cocoa powder, chopped nuts, or a drizzle of chocolate or caramel sauce to create a visually striking and tasty finish.
Side Dishes
Pair Banana Split Pie with light accompaniments like fresh berry salads or a scoop of vanilla ice cream to complement the rich flavors without overwhelming them.
Creative Ways to Present
Serve in individual mini pie tins for parties, or layer slices in clear parfait glasses with extra toppings for a fun layered dessert experience everyone will love.
Make Ahead and Storage
Storing Leftovers
Keep your Banana Split Pie covered tightly in the refrigerator for up to 3 days to maintain freshness and prevent the bananas from browning.
Freezing
This pie freezes beautifully; wrap it well in plastic wrap and foil, and freeze for up to 1 month. Thaw overnight in the fridge before serving.
Reheating
Since this is a cold dessert, it’s best served chilled. Avoid reheating to preserve the texture and flavor of the creamy filling and fresh bananas.
FAQs
Can I make Banana Split Pie ahead of time?
Absolutely! It actually benefits from chilling overnight, allowing the flavors to meld perfectly for a richer taste.
What type of bananas work best?
Ripe bananas with golden skins and some brown spots are ideal because they are sweeter and softer, adding natural sweetness and creaminess.
Can I use store-bought pie crust?
Yes, store-bought crusts can save time and still taste great; just be sure to select one that complements the dessert’s creamy texture.
Is Banana Split Pie gluten-free?
You can easily make it gluten-free by using gluten-free cookie crumbs or a nut-based crust instead of traditional graham crackers.
How long does this pie keep in the fridge?
It stays fresh for up to 3 days refrigerated, but it’s best enjoyed sooner to keep the bananas from browning and maintain the creamy texture.
Final Thoughts
Banana Split Pie is a delightful, crowd-pleasing dessert that brings the joy of a classic banana split to your table in pie form. Whether you’re celebrating a special occasion or simply craving a delicious homemade treat, this recipe promises happiness in every bite. Give it a try and watch it quickly become your go-to sweet favorite!
Related Posts
- Irresistible Tiramisu Cupcakes You Must Try
- Easy Strawberry Shortcake Trifles Recipe to Try
- Irresistible Pineapple Coconut God Bless America Cake Recipes

Banana Split Pie
- Total Time: 4 hours (includes chilling time)
- Yield: 8 servings 1x
- Diet: Gluten Free (if using gluten-free crust), Dairy-Free option available
Description
Banana Split Pie is a creamy, sweet dessert combining ripe bananas, rich chocolate, and fluffy whipped cream in a convenient pie form. This delicious pie captures all the flavors of a classic banana split and is perfect for any occasion. Its smooth banana layers, velvety chocolate filling, and airy whipped cream topping create a dreamy texture that’s simple to prepare and endlessly customizable.
Ingredients
For the Crust
- 1 1/2 cups graham cracker crumbs or cookie crumbs
- 1/4 cup melted butter
- 2 tablespoons sugar
For the Filling
- 3 to 4 ripe bananas
- 1 cup heavy cream or coconut cream (for vegan option)
- 1 teaspoon vanilla extract
- 1/4 cup sugar
- 1/2 cup melted chocolate or chocolate chips
For the Topping
- 1 cup freshly whipped cream or coconut whipped cream
- Optional garnishes: maraschino cherries, chocolate shavings, chopped nuts (pecans or walnuts), cocoa powder, chocolate or caramel sauce
Instructions
- Prepare the Crust: Mix crushed graham crackers or cookie crumbs with melted butter and sugar until combined. Press the mixture firmly into a pie pan to form an even, solid base. Chill in the fridge to set while preparing the filling.
- Layer the Bananas: Slice ripe bananas evenly and arrange them in a single layer over the chilled crust to form the fresh fruit base of the pie.
- Make the Creamy Filling: Whip heavy cream or coconut cream with vanilla extract and sugar until soft peaks form. Gently fold in melted chocolate to create a smooth, luxurious filling.
- Assemble the Pie: Pour the chocolate cream filling over the banana layer and spread evenly with a spatula, ensuring a balanced layer of banana and cream in every slice.
- Add Whipped Cream Topping: Generously spread or pipe freshly whipped cream over the top. Add extra dollops as desired for a classic banana split look. Chill for at least a few hours or overnight to let flavors meld.
- Garnish and Serve: Just before serving, decorate with your favorite toppings such as maraschino cherries, chocolate shavings, chopped nuts, or a drizzle of chocolate or caramel sauce.
Notes
- Choose ripe bananas with golden skins and some brown spots for maximum sweetness and softness.
- Chill the pie thoroughly to allow layers to set and flavors to meld.
- Use fresh whipped cream for the best texture and flavor instead of canned toppings.
- Brush banana slices with lemon juice to prevent browning.
- Taste the filling before assembling and adjust sugar levels as needed.
- Use gluten-free cookie crumbs or nut-based crust to make the pie gluten-free.
- Prep Time: 20 minutes
- Cook Time: 0 minutes
- Category: Dessert
- Method: No-bake
- Cuisine: American
Nutrition
- Serving Size: 1 slice (1/8 of pie)
- Calories: 320 kcal
- Sugar: 22 g
- Sodium: 150 mg
- Fat: 18 g
- Saturated Fat: 10 g
- Unsaturated Fat: 6 g
- Trans Fat: 0 g
- Carbohydrates: 36 g
- Fiber: 3 g
- Protein: 3 g
- Cholesterol: 45 mg
Keywords: banana split pie, banana pie, no bake dessert, gluten free dessert, chocolate banana pie, whipped cream pie, vegan dessert option