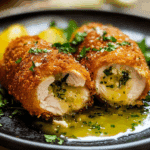
Why Chicken Kiev with Garlic Butter Tastes Amazing

Chicken Kiev with Garlic Butter is a classic dish that deserves all the love it gets, and for good reason. Imagine tender, juicy chicken breasts wrapped around a luscious garlic butter center, coated in a golden, crispy breadcrumb crust that crunches delightfully with every bite. This dish combines rich, savory flavors with satisfying textures, creating a comforting yet elegant meal that’s perfect for sharing with family and friends. If you’ve ever wondered why this recipe continues to capture hearts and taste buds worldwide, you’re about to find out exactly what makes Chicken Kiev with Garlic Butter so irresistibly delicious.
Why You’ll Love This Recipe
- Guaranteed Juiciness: The garlic butter inside melts into the chicken, making every bite irresistibly moist and flavorful.
- Crispy Perfection: The golden breadcrumb coating adds a satisfying crunch that contrasts beautifully with the tender meat.
- Flavor Explosion: The garlic and herb-infused butter brings a burst of rich, aromatic taste that’s simply unforgettable.
- Impressive Yet Easy: Despite its sophisticated look, the recipe is approachable for cooks of all skill levels.
- Versatile Pairings: Works wonderfully with various sides, making it a flexible choice for any meal occasion.
Ingredients You’ll Need
These ingredients are straightforward, easy to find, and each plays a key role in building the layers of flavor and texture that make Chicken Kiev with Garlic Butter so special. From the fresh garlic to the crisp breadcrumbs, every component counts.
- Chicken breasts: Choose boneless, skinless for easy rolling and even cooking.
- Unsalted butter: Softened for mixing with garlic; the star that ensures juicy richness.
- Fresh garlic cloves: Minced finely to create that irresistible garlic butter punch.
- Fresh parsley: Chopped finely for a fresh, herby note infused in the butter.
- Breadcrumbs: Provides the crunch; panko breadcrumbs work great for extra crispiness.
- All-purpose flour: Helps the coating stick perfectly to the chicken.
- Eggs: Beaten to bind the breadcrumbs to the chicken.
- Salt and pepper: Essential for seasoning both the chicken and the butter for balanced flavor.
- Vegetable or canola oil: For frying, chosen for its neutral flavor and high smoke point.
Variations for Chicken Kiev with Garlic Butter
Feel free to tweak the traditional Chicken Kiev with Garlic Butter recipe to fit your taste buds or dietary needs. Whether you want a lighter spin or a flavor boost, there are plenty of ways to make this dish yours.
- Herb swaps: Try adding tarragon or chives to the garlic butter for a different herbal aroma.
- Cheese addition: Mix shredded Parmesan or Gruyere into the butter for an extra creamy center.
- Gluten-free option: Use gluten-free breadcrumbs and flour substitutes to make it suitable for gluten sensitivities.
- Baking instead of frying: For a healthier version, bake the breaded chicken until golden and crispy.
- Spicy kick: Add a pinch of cayenne or smoked paprika to the butter to bring a mild heat.

How to Make Chicken Kiev with Garlic Butter
Step 1: Prepare the Garlic Butter
Start by mixing softened unsalted butter with minced fresh garlic and finely chopped parsley. Season the mixture with a pinch of salt and pepper, then shape it into a small log or several portions using plastic wrap. Chill it in the refrigerator until firm and easy to handle.
Step 2: Pound the Chicken
Take the boneless, skinless chicken breasts and place each between two sheets of plastic wrap. Use a meat mallet or rolling pin to gently pound the chicken until it’s about ¼ inch thick, creating an even surface that’s easier to roll.
Step 3: Roll the Chicken Around Garlic Butter
Place a chilled portion of garlic butter in the center of each flattened chicken breast. Fold the sides over the butter, then carefully roll it up tightly, ensuring that the butter is completely enclosed to prevent leakage during cooking. Secure with toothpicks if needed.
Step 4: Coat the Chicken
Set up a breading station with three shallow bowls: one with flour seasoned lightly with salt and pepper, one with beaten eggs, and one with breadcrumbs. Dredge each rolled chicken breast first in the flour, then dip in the egg, and finally coat thoroughly with breadcrumbs. For extra crunch, repeat the egg and breadcrumb step.
Step 5: Fry Until Golden
Heat vegetable oil in a deep pan or skillet over medium heat. Carefully place the breaded chicken rolls in the hot oil and fry, turning frequently, until all sides are golden brown and crispy—this typically takes about 7 to 10 minutes. Remove the chicken and drain on paper towels.
Step 6: Finish Cooking
To cook the chicken through without burning the crust, transfer the fried rolls to a preheated oven at 350°F (175°C) for 10-12 minutes. This ensures the chicken is perfectly cooked while the garlic butter melts inside.
Pro Tips for Making Chicken Kiev with Garlic Butter
- Chill the butter thoroughly: This prevents it from melting prematurely during frying.
- Use a meat mallet gently: Pound evenly to avoid tearing the chicken, which could cause butter leakage.
- Double-dip the coating: For an extra crispy crust, coat the chicken in egg and breadcrumbs twice.
- Maintain oil temperature: Keep the frying oil between 320°F and 350°F to achieve a golden crust without burning.
- Rest before slicing: Let the cooked Chicken Kiev with Garlic Butter rest for a few minutes so the butter stays inside when you cut it.
How to Serve Chicken Kiev with Garlic Butter
Garnishes
Fresh chopped parsley or a light sprinkle of lemon zest on top elevates the dish with color and a hint of brightness that complements the rich butter.
Side Dishes
This dish pairs wonderfully with creamy mashed potatoes, buttered green beans, or a simple fresh salad to balance the richness with refreshing textures and flavors.
Creative Ways to Present
Slice the Chicken Kiev in half diagonally for a dramatic reveal of the oozing garlic butter inside, arranged on a bed of sautéed vegetables or alongside rustic roasted potatoes for an eye-catching plate.
Make Ahead and Storage
Storing Leftovers
Keep any cooked Chicken Kiev with Garlic Butter refrigerated in an airtight container for up to 3 days to preserve freshness and flavor.
Freezing
For meal prep convenience, freeze unbaked, breaded chicken rolls individually on a tray and then transfer to a freezer bag. They can be cooked directly from frozen, adding extra time to the cooking process.
Reheating
Reheat leftovers in an oven or air fryer at moderate heat to restore crispness rather than microwaving, which can make the coating soggy and the butter less appealing.
FAQs
What is Chicken Kiev with Garlic Butter?
Chicken Kiev with Garlic Butter is a dish featuring chicken breasts stuffed with a seasoned garlic butter mixture, coated in breadcrumbs, and cooked until golden and crispy.
How do I prevent the garlic butter from leaking?
Ensure the butter is well chilled before wrapping the chicken, and seal the chicken breast edges firmly, using toothpicks if necessary to keep the butter encased.
Can I bake instead of frying Chicken Kiev with Garlic Butter?
Yes, baking is a healthier alternative and still yields a deliciously crispy crust if coated with panko crumbs and baked at a high temperature.
What sides go best with Chicken Kiev with Garlic Butter?
Classic sides include mashed potatoes, steamed green vegetables, roasted root veggies, or a light, fresh salad to counterbalance the richness of the dish.
Is Chicken Kiev with Garlic Butter difficult to make?
Not at all; with a few simple steps and essential tips, even beginner cooks can create an impressive Chicken Kiev that tastes restaurant-quality.
Final Thoughts
If you’re craving a warm, comforting dish that feels both special and approachable, Chicken Kiev with Garlic Butter is a fantastic choice. Its unbeatable combination of juicy chicken, melting garlic butter, and crispy coating makes every dinner moment memorable. Give this recipe a try and delight your taste buds with a timeless classic you’ll want to make over and over again.
Related Posts
- Easy Tacos de Canasta Recipes for Beginners
- Why Easy Oats Haleem Is a Must-Try Recipe
- Quick Instant Pot Chicken and Sausage Jambalaya
Chicken Kiev with Garlic Butter
- Total Time: 50 minutes
- Yield: 4 servings 1x
- Diet: Gluten Free (with substitutions)
Description
Chicken Kiev with Garlic Butter is a classic, elegant dish featuring tender, juicy chicken breasts encasing a flavorful garlic and herb-infused butter center. Coated in a golden, crispy breadcrumb crust, this recipe delivers a perfect balance of moist richness and satisfying crunch. Ideal for any meal occasion, it offers a sophisticated yet approachable preparation that guarantees a flavorful, aromatic experience with every bite.
Ingredients
Chicken
- 4 boneless, skinless chicken breasts
Garlic Butter
- 1/2 cup (1 stick) unsalted butter, softened
- 3–4 fresh garlic cloves, minced
- 2 tablespoons fresh parsley, finely chopped
- Salt and pepper, to taste
Breading
- 1 cup all-purpose flour (or gluten-free flour substitute)
- 2 large eggs, beaten
- 1 1/2 cups breadcrumbs (panko preferred, or gluten-free breadcrumbs)
- Salt and pepper, for seasoning flour
Frying
- Vegetable or canola oil, enough for frying (neutral flavor, high smoke point)
Instructions
- Prepare the Garlic Butter: In a small bowl, mix softened unsalted butter with minced garlic and finely chopped parsley. Season with a pinch of salt and pepper. Shape into a small log or several portions using plastic wrap. Refrigerate until firm and easy to handle.
- Pound the Chicken: Place each boneless, skinless chicken breast between two sheets of plastic wrap. Gently pound with a meat mallet or rolling pin until about 1/4 inch thick, creating an even surface suitable for rolling.
- Roll the Chicken Around Garlic Butter: Place a chilled portion of garlic butter in the center of each flattened chicken breast. Fold the sides over the butter and roll up tightly, ensuring the butter is fully enclosed. Secure with toothpicks if necessary.
- Coat the Chicken: Set up a breading station with three shallow bowls: one with flour seasoned lightly with salt and pepper, one with beaten eggs, and one with breadcrumbs. Dredge each rolled chicken breast first in the flour, then dip in the egg, and finally coat thoroughly with breadcrumbs. For an extra crispy crust, repeat the egg and breadcrumb step once more.
- Fry Until Golden: Heat vegetable or canola oil in a deep pan or skillet over medium heat to about 320°F-350°F. Carefully place the breaded chicken rolls in the hot oil. Fry, turning frequently, until all sides are golden brown and crisp, about 7 to 10 minutes. Remove and drain on paper towels.
- Finish Cooking: Transfer the fried chicken rolls to a preheated oven at 350°F (175°C) and bake for 10 to 12 minutes to ensure the chicken is cooked through and the garlic butter melts inside.
Notes
- Chill the garlic butter thoroughly before wrapping to prevent premature melting during frying.
- Use a meat mallet gently to avoid tearing the chicken and causing butter leakage.
- Double-dip the coating (egg and breadcrumbs twice) for extra crispy crust.
- Maintain frying oil temperature between 320°F and 350°F for golden crust without burning.
- Let the cooked Chicken Kiev rest for a few minutes before slicing to keep the garlic butter inside.
- Prep Time: 25 minutes
- Cook Time: 25 minutes
- Category: Appetizers
- Method: Frying and Baking
- Cuisine: European
Nutrition
- Serving Size: 1 Chicken Kiev
- Calories: 450
- Sugar: 1g
- Sodium: 350mg
- Fat: 30g
- Saturated Fat: 15g
- Unsaturated Fat: 12g
- Trans Fat: 0g
- Carbohydrates: 20g
- Fiber: 1g
- Protein: 35g
- Cholesterol: 120mg
Keywords: Chicken Kiev, Garlic Butter Chicken, Crispy Chicken, Stuffed Chicken Breast, Elegant Chicken Recipe, Classic Chicken Dish