Easy Chicken Roll Ups to Impress Guests

If you’re looking for a delightful way to impress guests without spending hours in the kitchen, Chicken Roll Ups are your new best friend. This delicious and simple Chicken Roll Ups recipe combines tender chicken breast, flavorful fillings, and a beautiful presentation that promises to wow your guests with minimal effort. Whether it’s a casual dinner party or a special occasion, these roll ups bring together the perfect balance of taste, texture, and color to elevate any meal effortlessly.
Why You’ll Love This Recipe
- Quick and easy preparation: Ready in under 30 minutes, perfect for hosting without stress.
- Impressive presentation: Each roll up looks like a gourmet delight that your guests will admire.
- Customizable flavors: Adapt fillings based on your preferences or what’s in season.
- Healthy choice: Lean chicken breast paired with fresh ingredients makes for a nutritious meal.
- Perfect for any occasion: Suitable for weeknight dinners, brunches, or elegant parties.
Ingredients You’ll Need
The beauty of this Chicken Roll Ups recipe lies in its simplicity. Each ingredient plays a vital role, from adding juicy flavor and texture to making every bite satisfying and colorful. Here’s what you’ll gather before getting started:
- Chicken breasts: Boneless and thinly sliced for easy rolling and quick cooking.
- Cheese: Mozzarella or cream cheese adds creamy richness and helps hold the roll together.
- Fresh spinach or basil leaves: Adds a pop of green color and a fresh, vibrant flavor.
- Sun-dried tomatoes: Provide a tangy, slightly sweet contrast that enhances the savory chicken.
- Olive oil or butter: For sautéing and adding a beautiful golden crust.
- Salt and pepper: Essential seasonings to balance and highlight the flavors.
Variations for Chicken Roll Ups
One of the best things about Chicken Roll Ups is how easy it is to customize. Whether you want to swap ingredients because of dietary needs or just want to try a new flavor profile, these variations keep the recipe fresh and exciting.
- Vegetarian twist: Replace chicken with thin slices of zucchini or eggplant for a meat-free option.
- Spicy kick: Add some crushed red pepper flakes or a slice of jalapeño inside the rolls.
- Herb infusion: Mix chopped fresh herbs like thyme, rosemary, or oregano into the cheese.
- Different cheeses: Use goat cheese, feta, or cheddar for varied creamy textures and tastes.
- Gluten-free option: Simply ensure all ingredients are gluten-free and serve with gluten-free sides.

How to Make Chicken Roll Ups
Step 1: Prepare the chicken breasts
Start by carefully slicing the chicken breasts horizontally to create thin, even fillets for easy rolling. If needed, use a meat mallet to gently pound chicken to an even thickness of about a quarter-inch.
Step 2: Add the fillings
Lay the chicken flat and spread a thin layer of cheese over each piece. Layer fresh spinach leaves and sun-dried tomatoes on top of the cheese, ensuring even distribution for flavor in every bite.
Step 3: Roll the chicken
Starting from one edge, tightly roll the chicken breast around the fillings, securing the roll with toothpicks to keep everything in place while cooking.
Step 4: Cook the roll ups
Heat olive oil or butter in a skillet over medium heat. Carefully place the roll ups seam side down and brown each side until golden and cooked through, about 4-5 minutes per side.
Step 5: Rest and serve
Once cooked, remove toothpicks and let the roll ups rest for a few minutes to seal in the juices before slicing or serving whole, allowing for maximum flavor and beautiful presentation.
Pro Tips for Making Chicken Roll Ups
- Uniform thickness: Pound the chicken for even cooking and easier rolling.
- Don’t overfill: Use moderate amounts of filling to prevent spillage and messy cooking.
- Secure with toothpicks: Keeps the roll ups intact and neat during cooking.
- Use a hot skillet: Ensures a golden crust without overcooking the chicken inside.
- Rest before slicing: Helps the juices redistribute for juicier, more flavorful rolls.
How to Serve Chicken Roll Ups
Garnishes
A sprinkle of fresh herbs like parsley or basil adds a burst of color and freshness, while a light drizzle of balsamic glaze or a squeeze of lemon juice provides an extra layer of zing to complement the rich fillings.
Side Dishes
Pair your Chicken Roll Ups with roasted vegetables, garlic mashed potatoes, or a crisp green salad for a balanced and satisfying meal that caters to different tastes and textures on the plate.
Creative Ways to Present
Slice each roll up into bite-sized rounds for appetizers or serve whole with a vibrant sauce arranged artistically on the plate—turning an everyday meal into a show-stopping dish.
Make Ahead and Storage
Storing Leftovers
Place any leftover Chicken Roll Ups in an airtight container and refrigerate for up to 3 days, keeping the flavors fresh and ready for a quick next-day meal.
Freezing
Wrap individual roll ups tightly in plastic wrap and aluminum foil before freezing. They keep well for up to 2 months and can be thawed overnight in the fridge before reheating.
Reheating
Warm leftovers gently in a preheated oven at 350°F (175°C) for 10-15 minutes or microwave on medium-power to ensure the chicken stays juicy and the filling melts perfectly.
FAQs
Can I use chicken thighs instead of breasts?
Yes, boneless, skinless chicken thighs can be used but may require a bit more attention to ensure even thickness and thorough cooking.
What if I don’t have sun-dried tomatoes?
You can substitute with fresh tomatoes or roasted red peppers for a similar sweet and tangy flavor profile.
How can I make this recipe dairy-free?
Use a dairy-free cheese alternative or omit the cheese altogether and increase fresh herbs and veggies for flavor.
Is it possible to bake instead of pan-frying?
Absolutely! Bake the roll ups in a preheated oven at 375°F (190°C) for 25-30 minutes or until cooked through and golden.
Can I prepare the roll ups ahead of time?
Yes, you can assemble the roll ups in advance and refrigerate for a few hours, then cook just before serving to maintain freshness.
Final Thoughts
Chicken Roll Ups are a charming and versatile dish that effortlessly combines flavor, elegance, and ease. Give this recipe a try at your next gathering and watch your guests’ eyes light up with delight. With just a handful of ingredients and simple steps, you can create a memorable meal that feels special and satisfying every time.
Related Posts
- Why Amazing Forgotten Chicken Is a Must-Try Meal
- How to Make Old South Coca-Cola Pork Loin
- How to Make Italian Garlic Shrimp Fast
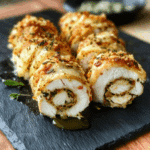
Chicken Roll Ups
- Total Time: 25 minutes
- Yield: 4 servings 1x
- Diet: Gluten Free
Description
Chicken Roll Ups are a quick and elegant dish featuring tender chicken breasts rolled with creamy cheese, fresh spinach or basil, and tangy sun-dried tomatoes. Ready in under 30 minutes, these roll ups deliver a perfect balance of flavors, textures, and colors, making them ideal for casual dinners, brunches, or special occasions. Customizable and healthy, this recipe impresses with minimal effort and maximum taste.
Ingredients
Main Ingredients
- 2 boneless, skinless chicken breasts, thinly sliced or pounded to 1/4-inch thickness
- 4 oz mozzarella cheese or cream cheese
- 1 cup fresh spinach or basil leaves
- 1/3 cup sun-dried tomatoes, chopped
- 2 tbsp olive oil or butter
- Salt and pepper, to taste
Instructions
- Prepare the chicken breasts: Carefully slice the chicken breasts horizontally to create thin, even fillets. If needed, use a meat mallet to gently pound the chicken to an even thickness of about a quarter-inch for easy rolling and even cooking.
- Add the fillings: Lay each chicken fillet flat and spread a thin layer of mozzarella or cream cheese over it. Then, layer fresh spinach leaves and chopped sun-dried tomatoes evenly on top of the cheese to ensure flavor in every bite.
- Roll the chicken: Starting from one edge, tightly roll the chicken breast around the fillings. Secure each roll with toothpicks to keep everything in place while cooking.
- Cook the roll ups: Heat olive oil or butter in a skillet over medium heat. Place the roll ups seam side down in the skillet and cook each side for about 4-5 minutes until golden brown and the chicken is cooked through.
- Rest and serve: Once cooked, carefully remove the toothpicks and let the roll ups rest for a few minutes to seal in juices. Slice into rounds or serve whole for an elegant presentation.
Notes
- Uniform thickness: Pound the chicken evenly for consistent cooking and easier rolling.
- Don’t overfill: Use moderate amounts of filling to prevent spillage and maintain neat rolls.
- Secure with toothpicks: Essential to keep the roll ups intact while cooking.
- Use a hot skillet: Ensures a golden crust without overcooking the chicken inside.
- Rest before slicing: Let the roll ups rest to redistribute juices for juicier, more flavorful bites.
- Prep Time: 10 minutes
- Cook Time: 15 minutes
- Category: Appetizers
- Method: Pan-frying
- Cuisine: American
Nutrition
- Serving Size: 1 roll up
- Calories: 250 kcal
- Sugar: 2 g
- Sodium: 450 mg
- Fat: 12 g
- Saturated Fat: 5 g
- Unsaturated Fat: 6 g
- Trans Fat: 0 g
- Carbohydrates: 4 g
- Fiber: 1 g
- Protein: 30 g
- Cholesterol: 90 mg
Keywords: chicken roll ups, easy chicken recipe, stuffed chicken, healthy chicken, quick dinner, gluten free