How to Make Chocolate Easter Egg Nest Cake
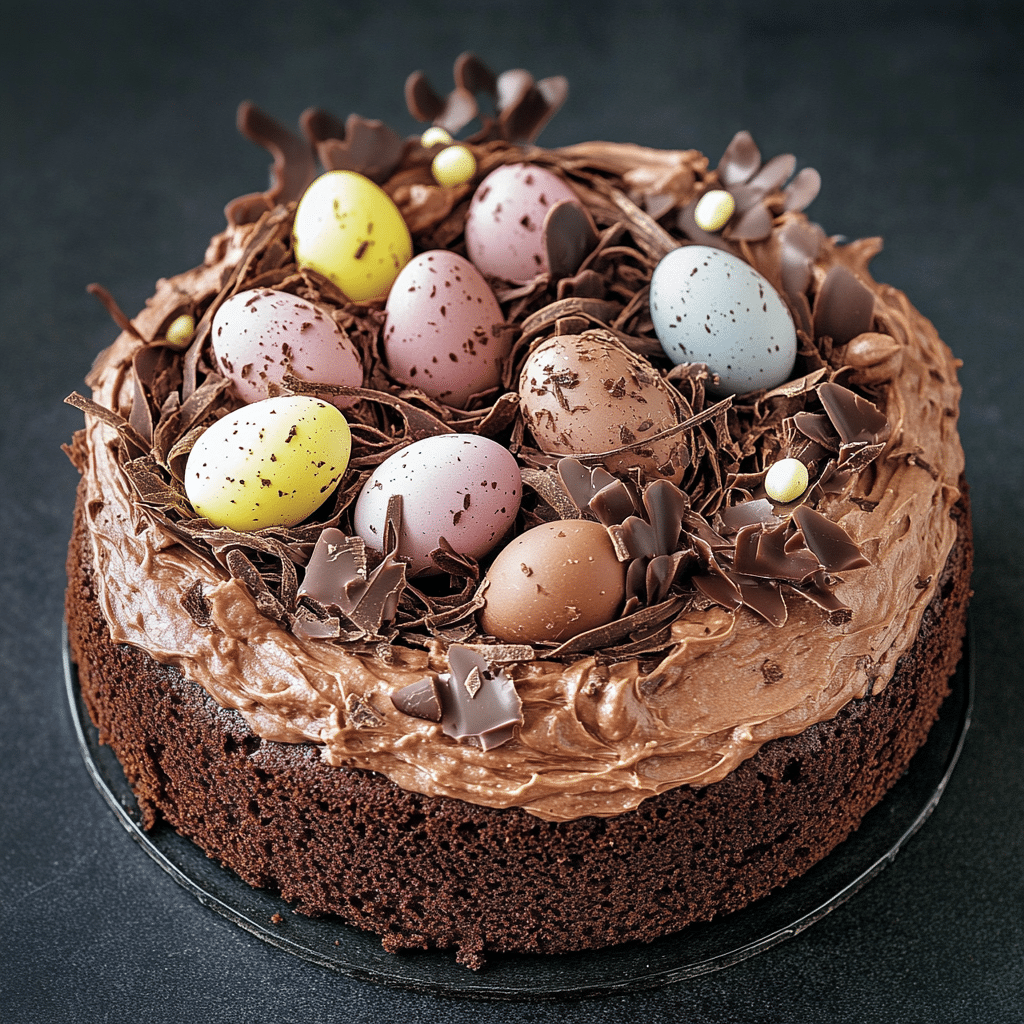
Celebrate spring with a delightful treat that’s as charming as it is delicious: the Chocolate Easter Egg Nest Cake. This whimsical dessert combines rich chocolate layers with a fun, festive nest design that’s perfect for Easter gatherings or simply brightening up any family occasion. Whether you’re a seasoned baker or just love an easy recipe with big impact, this Chocolate Easter Egg Nest Cake will quickly become your go-to for creating smiles and sweet memories.
Why You’ll Love This Recipe
- Effortless elegance: It looks impressive but is surprisingly simple to make, perfect for bakers of all skill levels.
- Seasonal fun: The nest design and colorful Easter eggs bring a playful and festive touch to your dessert table.
- Rich chocolate flavor: Every bite is packed with deep chocolate goodness that satisfies any sweet tooth.
- Family-friendly: Kids love helping with decorating, making it a perfect activity and dessert combo.
- Versatile presentation: Suitable for casual family lunches or more formal holiday dinners alike.
Ingredients You’ll Need
This recipe keeps things simple, focusing on ingredients that shine both in flavor and texture. Each component is essential, coming together to create a moist, chocolatey cake and a playful nest top that adds wow factor.
- All-purpose flour: The base that gives structure and softness to the cake layers.
- Cocoa powder: Provides that rich, unmistakable chocolate depth.
- Sugar: Balances the cocoa with sweetness and helps the cake stay moist.
- Baking powder and baking soda: Work together to give the cake a light, fluffy texture.
- Butter and eggs: Add richness and help bind the ingredients perfectly.
- Milk or buttermilk: Keeps the cake tender and moist, enhancing the chocolate flavor.
- Vanilla extract: Boosts the overall flavor with a warm, sweet aroma.
- Chocolate Easter eggs: The festive finishing touch that makes the nest theme come alive.
- White chocolate or candy melts (optional): For drizzling or creating a nest effect on top of the cake.
Variations for Chocolate Easter Egg Nest Cake
Personalizing your Chocolate Easter Egg Nest Cake is a breeze, whether you want to accommodate dietary preferences or simply experiment with flavors. Feel free to adapt these ideas to make the cake truly your own.
- Gluten-free option: Substitute all-purpose flour with a gluten-free blend without compromising taste or texture.
- Vegan twist: Use flax eggs and dairy-free butter or oil along with plant-based milk for a cruelty-free delight.
- Nutty upgrade: Add chopped nuts to the batter or nest topping for crunch and extra flavor.
- Fruit infusion: Mix in fresh raspberries or orange zest for a fruity pop that balances chocolate’s richness.
- Alternative nest materials: Use shredded coconut, toasted pretzel sticks, or crispy cereal in place of or alongside chocolate for texture variety.

How to Make Chocolate Easter Egg Nest Cake
Step 1: Prepare your Bakeware and Ingredients
Begin by preheating your oven to 350°F (175°C). Grease and flour two 8-inch round cake pans to ensure the cake layers come out perfectly. Gather and measure all your ingredients precisely for smooth preparation.
Step 2: Mix the Dry Ingredients
In a large bowl, sift together the flour, cocoa powder, baking powder, baking soda, and a pinch of salt. This step ensures even distribution and a lighter cake texture.
Step 3: Cream Butter and Sugar
Using a mixer, beat softened butter and sugar until fluffy and pale in color. This aerates the mixture, contributing to a light crumb in the final cake.
Step 4: Add Eggs and Vanilla
Incorporate the eggs one at a time, beating well after each addition, then stir in the vanilla extract for aromatic depth.
Step 5: Combine Wet and Dry Ingredients
Alternate adding the dry mixture and the milk to the butter mixture, starting and ending with dry ingredients. Mix gently until just combined to prevent a dense texture.
Step 6: Bake the Cake Layers
Divide your batter evenly between the prepared pans and bake for 25 to 30 minutes. Test doneness with a toothpick – it should come out clean or with a few moist crumbs.
Step 7: Cool and Prepare the Nest
Let the cakes cool completely on wire racks. Meanwhile, start preparing your nest topping by melting white chocolate or candy melts to create a web-like pattern for the nest.
Step 8: Assemble and Decorate
Stack the cooled cake layers with your favorite frosting or chocolate ganache. On top, drip or pipe the melted white chocolate in a tangled circular pattern to resemble a nest, then place your colorful Chocolate Easter eggs carefully within it.
Pro Tips for Making Chocolate Easter Egg Nest Cake
- Room temperature ingredients: Ensure butter, eggs, and milk are at room temperature to achieve a smoother batter.
- Don’t overmix: Stir the batter just enough to combine ingredients for a tender crumb.
- Use high-quality cocoa powder: It makes a noticeable difference in the depth of chocolate flavor.
- Cool the cake fully: Decorating a warm cake can cause frosting and melted decorations to slide or melt undesirably.
- Customize the nest: Play with different colors and sizes of Easter eggs for extra visual appeal.
How to Serve Chocolate Easter Egg Nest Cake
Garnishes
Fresh mint leaves or edible flowers add a spring freshness that elevates the chocolate richness—perfect alongside a dusting of powdered sugar or cocoa for a delicate finish.
Side Dishes
Serve your Chocolate Easter Egg Nest Cake with a scoop of vanilla ice cream, whipped cream, or fresh berry compote for complementary flavors and refreshing contrasts.
Creative Ways to Present
Use a rustic wooden board or a pastel-colored cake stand for displaying your cake, and scatter mini chocolate eggs or sugar pearls around the base for that extra festive cheer.
Make Ahead and Storage
Storing Leftovers
Keep leftover cake in an airtight container at room temperature for up to two days or refrigerate to extend freshness for up to a week. Bring to room temperature before serving for best taste.
Freezing
Wrap the cake tightly in plastic wrap and aluminum foil, then freeze for up to three months. Thaw overnight in the fridge and decorate fresh if desired.
Reheating
Serve chocolate cake slightly warmed for a soft texture by heating individual slices in the microwave for 10-15 seconds, or enjoy cold if you prefer a firmer bite.
FAQs
Can I make this cake gluten-free?
Absolutely! Swap the all-purpose flour for a gluten-free baking blend, making sure it contains xanthan gum to help with the cake’s structure.
What can I use instead of chocolate Easter eggs?
You can substitute with jellybeans, mini marshmallows, or even fresh fruit like grapes for a colorful and tasty alternative nest filling.
Is this recipe suitable for kids to help with?
Yes, decorating the nest and placing Easter eggs is a fun activity for kids, while adults can handle baking and assembling stages.
How long does this cake stay fresh?
If stored properly in an airtight container, the cake will remain fresh for about 5 to 7 days when refrigerated.
Can I use this recipe for other occasions?
Definitely! Customize the toppings and colors to suit birthdays, baby showers, or any festive celebration.
Final Thoughts
There’s something truly special about sharing a beautifully festive dessert that tastes just as amazing as it looks. The Chocolate Easter Egg Nest Cake combines classic chocolate flavor with playful Easter charm, making it a beautiful centerpiece and a guaranteed crowd-pleaser. Give this recipe a try and watch your family and friends light up with joy—it’s one cake you’ll love making again and again.
Related Posts
- Why Honey Bun Cake Is Your Next Favorite Treat
- Why Best Pumpkin Cheesecake Bars Will Delight You
- Why Best Cinnamon Roll Cake Will Delight You
Chocolate Easter Egg Nest Cake
- Total Time: 55 minutes
- Yield: 12 servings 1x
- Diet: Gluten Free
Description
Celebrate spring with the delightful Chocolate Easter Egg Nest Cake, a whimsical and festive dessert combining rich, moist chocolate cake layers with a playful nest design topped with colorful Easter eggs. Perfect for Easter or any family occasion, this easy-to-make cake offers rich chocolate flavor, family-friendly fun, and versatile presentation for both casual and formal gatherings.
Ingredients
Cake Ingredients
- 1 and 3/4 cups all-purpose flour (or gluten-free blend for gluten-free option)
- 3/4 cup unsweetened cocoa powder
- 1 and 1/2 teaspoons baking powder
- 1 and 1/2 teaspoons baking soda
- 1/2 teaspoon salt
- 1 cup unsalted butter, softened
- 1 and 1/2 cups granulated sugar
- 3 large eggs, room temperature
- 2 teaspoons vanilla extract
- 1 cup milk or buttermilk, room temperature
Decorations and Nest Topping
- Chocolate Easter eggs, assorted colors and sizes
- White chocolate or candy melts (optional), for drizzling and nest effect
Optional Variations
- Flax eggs and dairy-free butter or oil with plant-based milk for vegan version
- Chopped nuts for added texture and flavor
- Fresh raspberries or orange zest for fruit infusion
- Shredded coconut, toasted pretzel sticks, or crispy cereal as nest alternatives
Instructions
- Prepare your Bakeware and Ingredients: Preheat oven to 350°F (175°C). Grease and flour two 8-inch round cake pans. Gather and measure all ingredients precisely for a smooth preparation.
- Mix the Dry Ingredients: In a large bowl, sift together the flour, cocoa powder, baking powder, baking soda, and salt to ensure even distribution and a lighter cake texture.
- Cream Butter and Sugar: Using a mixer, beat softened butter and sugar until fluffy and pale in color to aerate the mixture for a light crumb.
- Add Eggs and Vanilla: Incorporate eggs one at a time, beating well after each addition. Then stir in the vanilla extract for aromatic depth.
- Combine Wet and Dry Ingredients: Alternately add the dry mixture and milk to the butter mixture, starting and ending with dry ingredients. Mix gently until just combined to avoid dense texture.
- Bake the Cake Layers: Divide batter evenly between prepared pans and bake for 25 to 30 minutes. Test doneness with a toothpick—it should come out clean or with a few moist crumbs.
- Cool and Prepare the Nest: Let cakes cool completely on wire racks. Meanwhile, melt white chocolate or candy melts to create a web-like pattern resembling a nest.
- Assemble and Decorate: Stack cooled layers with your favorite frosting or chocolate ganache. Drip or pipe melted white chocolate in a tangled circular pattern on top to mimic a nest, then place colorful Chocolate Easter eggs carefully inside.
Notes
- Use room temperature ingredients (butter, eggs, milk) for a smoother batter.
- Do not overmix batter to maintain a tender crumb.
- Choose high-quality cocoa powder for richer chocolate flavor.
- Make sure the cake is fully cooled before decorating to prevent sliding or melting.
- Customize the nest using different colors and sizes of Easter eggs for visual appeal.
- Prep Time: 20 minutes
- Cook Time: 25-30 minutes
- Category: Dessert
- Method: Baking
- Cuisine: American
Nutrition
- Serving Size: 1 slice
- Calories: 350
- Sugar: 28g
- Sodium: 200mg
- Fat: 18g
- Saturated Fat: 10g
- Unsaturated Fat: 7g
- Trans Fat: 0g
- Carbohydrates: 42g
- Fiber: 3g
- Protein: 5g
- Cholesterol: 60mg
Keywords: Chocolate cake, Easter cake, festive dessert, nest cake, holiday cake, family-friendly, easy baking, spring dessert