How to Make Spooky Ghost Toasts Fast
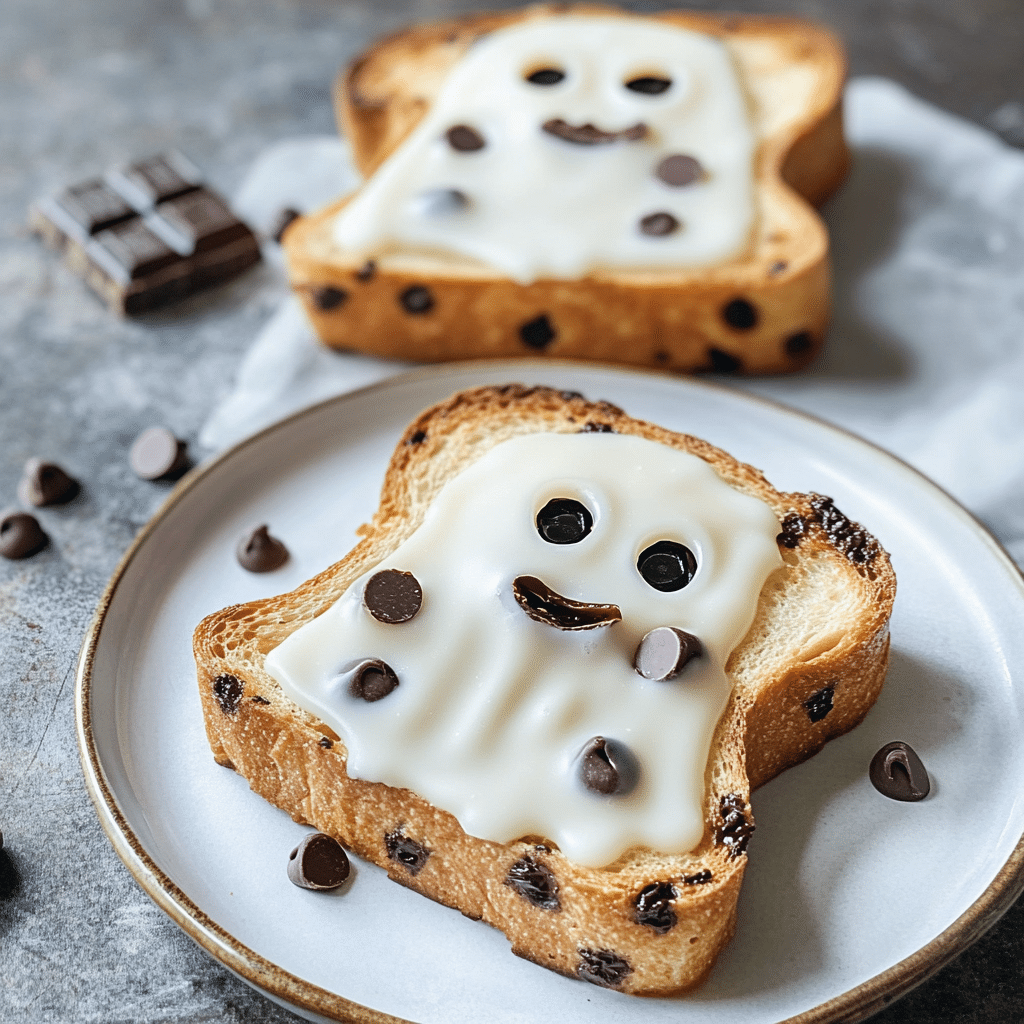
If you’re on the lookout for a quick, fun, and delightfully spooky treat, learning how to make Ghost Toasts is an absolute must! This simple recipe brings together the classic comfort of toast with a playful Halloween twist that everyone will enjoy. Ghost Toasts not only look adorable but are also incredibly easy to prepare, making them perfect for last-minute celebrations or a festive breakfast. With just a few everyday ingredients, you’ll have a crowd-pleaser that balances both taste and seasonal charm perfectly.
Why You’ll Love This Recipe
- Quick and Easy: Ghost Toasts take under 15 minutes from start to finish, perfect for busy mornings or spontaneous gatherings.
- Kid-Friendly: This recipe’s fun presentation makes it a hit with kids, inspiring smiles and excitement around the table.
- Customizable: Whether you want it sweet or savory, Ghost Toasts can be tailored to fit your taste and dietary preferences.
- Festive Fun: The spooky ghost shape adds a perfect Halloween vibe without requiring complicated decorations.
- Minimal Ingredients: Uses simple pantry staples, making it accessible for anyone, anytime.
Ingredients You’ll Need
Making Ghost Toasts is all about simplicity with a few well-chosen ingredients that create perfect texture, flavor, and appearance. Each ingredient contributes to that satisfying crunch, melt-in-your-mouth softness, or spooky allure.
- Bread slices: Use white or whole wheat for a sturdy base that crisps up nicely when toasted.
- Cheese slices or spread: Melted cheese creates that ghost silhouette, or use cream cheese for a smoother look.
- Olives or chocolate chips: Perfect for crafting ghostly eyes that really bring your punches to life.
- Butter or margarine: Adds richness and gives that golden toasted finish.
- Optional spices: A touch of cinnamon or pumpkin spice can elevate the flavor for a sweet twist.
Variations for Ghost Toasts
The beauty of Ghost Toasts lies in their versatility — you can easily customize the recipe according to what you have in your kitchen, dietary needs, or flavor preferences. Here are some fun ideas to get you started!
- Sweet Ghosts: Swap cheese for peanut butter and use banana slices for eyes for a natural sweetness.
- Savory Ghosts: Use mozzarella or cheddar cheese and add tiny pieces of olives for an extra zing.
- Vegan Variation: Use plant-based cheese and dairy-free butter alternatives to keep it cruelty-free.
- Gluten-Free Option: Substitute regular bread with your favorite gluten-free variety without compromising taste.
- Extra Spooky: Add edible food coloring eyes or drizzle with black icing for a Halloween flair.

How to Make Ghost Toasts
Step 1: Prepare the Bread
Start by selecting your bread slices and lightly butter them on both sides to ensure they toast to a golden brown. This adds a crispy, flavorful touch that makes the Ghost Toasts irresistibly crunchy.
Step 2: Cut Ghost Shapes
Using a ghost-shaped cookie cutter or a simple knife, cut out ghost silhouettes from the bread slices. Don’t worry if you don’t have a cutter — freehand cutting helps add a charming homemade feel!
Step 3: Add the Cheese
Place a slice of your chosen cheese or spread cream cheese smoothly onto each ghost shape. This will create the ghost’s body that melts beautifully when toasted.
Step 4: Toast the Ghosts
Place the prepared ghost-shaped bread on a baking sheet and toast under the broiler or in a toaster oven for about 3-5 minutes until the edges are crisp and the cheese has melted perfectly.
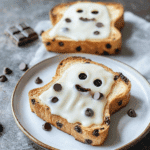
Step 5: Create the Eyes and Mouth
Use small pieces of olives, chocolate chips, or raisins to make playful ghost eyes and a mouth. Position them carefully to make your Ghost Toasts look spooky and fun.
Pro Tips for Making Ghost Toasts
- Use Firm Bread: Choose bread that is slightly stale or a bit dense so it holds up well when toasted and cut.
- Don’t Overdo the Cheese: Use a moderate amount of cheese to avoid sogginess but enough to cover the entire ghost shape.
- Watch the Toasting Time: Keep an eye on the toast when broiling to prevent burning, as oven heat varies.
- Create Even Eye Placement: Symmetrical eyes make your ghost look extra cute and professional.
- Experiment with Spices: Sprinkle cinnamon sugar or savory herbs on top before toasting for an exciting flavor twist.
How to Serve Ghost Toasts
Garnishes
Adding simple garnishes like a sprinkle of powdered sugar, a drizzle of honey, or a few fresh mint leaves can enhance the look and taste of Ghost Toasts, making them irresistible not only as a visual treat but also in flavor.
Side Dishes
Pair your Ghost Toasts with fresh fruit slices, pumpkin soup, or a warm cup of spiced cider for a complete festive meal that’s balanced and satisfying.
Creative Ways to Present
Arrange your Ghost Toasts on a black or orange platter for maximum Halloween effect, or pop them on sticks for adorable “ghost lollipops” that kids love to hold and eat.
Make Ahead and Storage
Storing Leftovers
Place leftover Ghost Toasts in an airtight container in the refrigerator and consume within 1-2 days to maintain freshness and texture.
Freezing
If you want to prepare ahead, flash freeze the toasted ghosts on a baking sheet before transferring to a freezer bag; this way, you can reheat them quickly without sacrificing quality.
Reheating
Reheat Ghost Toasts in a toaster oven or regular oven to restore crispiness. Avoid microwaving as it can make them soggy.
FAQs
Can I use different types of bread for Ghost Toasts?
Absolutely! You can use white, whole wheat, sourdough, or even gluten-free bread based on your preference; just make sure the slices are sturdy enough for cutting and toasting.
What if I don’t have a ghost-shaped cookie cutter?
No worries — simply cut the bread into oval or irregular shapes freehand to mimic a ghost’s silhouette for that homemade charm.
Are Ghost Toasts suitable for vegan diets?
They can be! By using plant-based cheese and butter alternatives, you can enjoy spooky Ghost Toasts that fit vegan diets perfectly.
Can I make Ghost Toasts in advance?
Yes, you can prepare and toast the bread shapes ahead of time, then add eyes and decorate before serving to keep them fresh and festive.
What drinks pair well with Ghost Toasts?
Hot chocolate, warm apple cider, or a pumpkin spice latte complement the cozy flavors of Ghost Toasts beautifully, enhancing your Halloween experience.
Final Thoughts
Ghost Toasts are an absolute delight and an easy way to add festive fun to your Halloween menu. Whether for breakfast, a spooky snack, or a party treat, this recipe lets you whip up something adorable and delicious in no time. Give it a try, impress your family or guests, and enjoy the smiles that come with every bite of these charming Ghost Toasts!
Related Posts
- Why Chorizo Breakfast Chili with Sweet Potatoes Rocks
- Irresistible Blueberry Muffins with Lemon Glaze Delight
- Easy Cottage Cheese Eggs Breakfast Ideas
Ghost Toasts
- Total Time: 12 minutes
- Yield: 4 ghost toasts
- Diet: Gluten Free
Description
Ghost Toasts are a quick, fun, and delightfully spooky treat perfect for Halloween breakfasts or snacks. Combining simple pantry staples, this easy recipe transforms ordinary toast into adorable ghost-shaped delights with customizable sweet or savory options, sure to please kids and adults alike with their festive charm and delicious flavor.
Ingredients
Basic Ingredients
- Bread slices (white, whole wheat, or gluten-free) – 4 slices
- Cheese slices or cream cheese – 4 slices or 1/2 cup spread
- Olives or chocolate chips – for eyes and mouth, about 8 pieces
- Butter or margarine – 2 tablespoons, softened
- Optional spices (cinnamon or pumpkin spice) – 1/4 teaspoon
Variation Ingredients
- Peanut butter – 4 tablespoons (for sweet version)
- Banana slices – 8 (for sweet version eyes)
- Mozzarella or cheddar cheese – 4 slices (for savory version)
- Plant-based cheese and dairy-free butter alternatives – quantity as above (for vegan version)
- Gluten-free bread – 4 slices (for gluten-free option)
- Black edible food coloring or black icing – for extra spooky decoration
Instructions
- Prepare the Bread: Select your bread slices and lightly butter both sides to help them toast golden brown and crispy.
- Cut Ghost Shapes: Using a ghost-shaped cookie cutter or a knife, cut ghost silhouettes out of each slice. Freehand cutting is fine for a homemade look.
- Add the Cheese: Place a slice of cheese or spread cream cheese evenly on each ghost shape to form the ghost body.
- Toast the Ghosts: Arrange the prepared ghost shapes on a baking sheet and toast under the broiler or in a toaster oven for 3-5 minutes, until edges are crisp and cheese melts.
- Create the Eyes and Mouth: Use small pieces of olives, chocolate chips, or raisins to carefully place eyes and mouths on each ghost for a playful, spooky appearance.
Notes
- Use slightly stale or dense bread for sturdiness when cutting and toasting.
- Moderate cheese quantity prevents sogginess but covers the ghost shape well.
- Watch broiling time closely to avoid burning since oven heat varies.
- Place eyes symmetrically for a cute, professional look.
- Experiment by sprinkling cinnamon sugar or savory herbs before toasting for flavor twists.
- Prep Time: 7 minutes
- Cook Time: 5 minutes
- Category: Appetizers
- Method: Baking
Nutrition
- Serving Size: 1 ghost toast
- Calories: 150
- Sugar: 2g
- Sodium: 250mg
- Fat: 8g
- Saturated Fat: 3g
- Unsaturated Fat: 4g
- Trans Fat: 0g
- Carbohydrates: 15g
- Fiber: 1g
- Protein: 6g
- Cholesterol: 15mg
Keywords: ghost toasts, Halloween recipe, spooky breakfast, easy toast recipe, kid-friendly snack, festive appetizer, gluten free, vegan options