How to Make Krispies Easter Egg Nests Fast
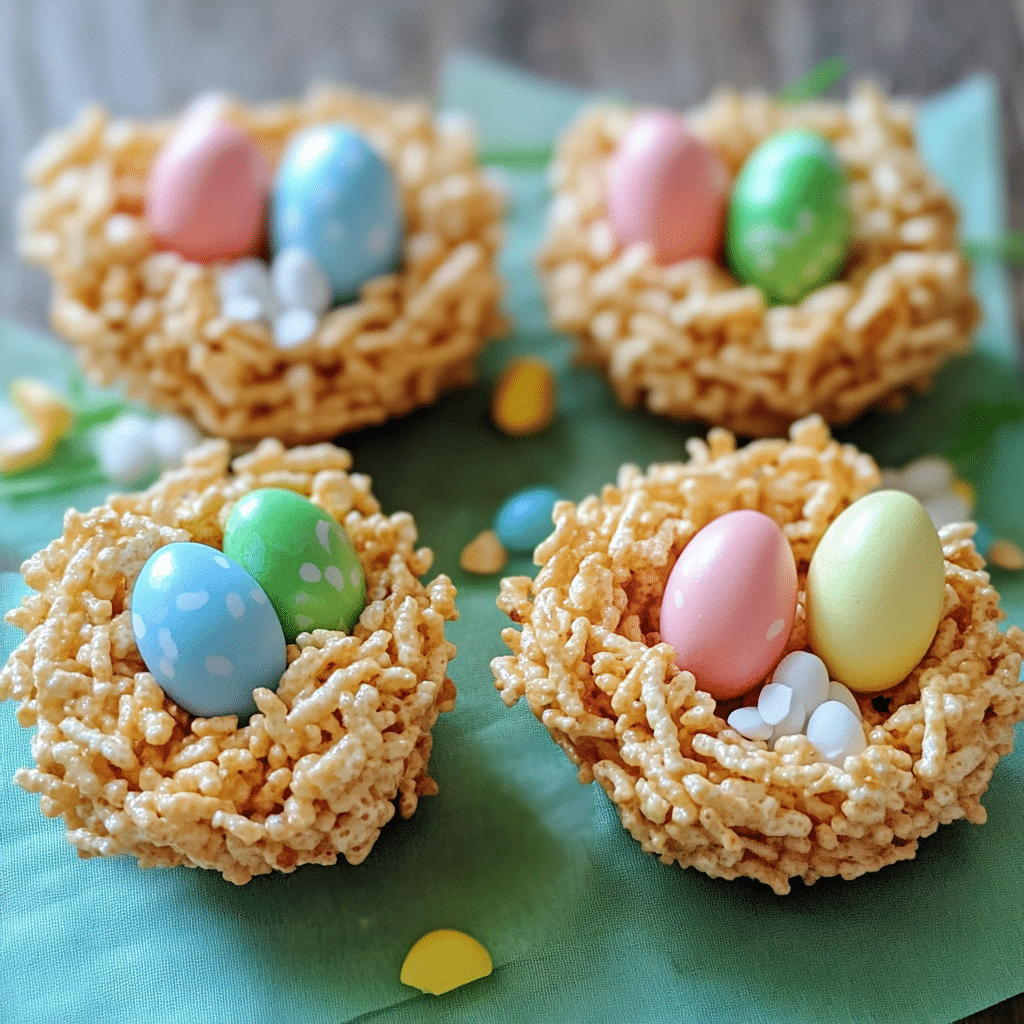
If you’re looking for a fun, quick, and absolutely delightful treat to celebrate the season, these Krispies Easter Egg Nests are just what you need. Bursting with sweet, crispy texture and charming pastel Easter eggs nestled right on top, this recipe is a festive favorite that comes together in no time. Whether you’re making them for a party, school treat, or a cozy family gathering, these nests are sure to bring smiles and satisfy sweet cravings with ease.
Why You’ll Love This Recipe
- Speedy Preparation: You can whip these Krispies Easter Egg Nests up in under 20 minutes, perfect for last-minute celebrations.
- Kid-Friendly Fun: It’s easy enough for kids to help, making it a perfect project for family bonding.
- Delightfully Crunchy Texture: The crispy rice cereal holds a light sweetness that pairs beautifully with the chocolate eggs.
- Versatile to Customize: You can switch up the candy eggs and add mix-ins to suit any taste or dietary preference.
- Eye-Catching Presentation: These nests look adorable on any dessert table, adding a charming Easter vibe instantly.
Ingredients You’ll Need
The ingredients for these Krispies Easter Egg Nests are simple staples, each playing a key role in creating the perfect combination of flavor, texture, and color. From the classic crispy rice cereal base to the sweet binding agent and colorful eggs on top, every element is essential for that perfect festive treat.
- Crispy Rice Cereal: This forms the crunchy and airy base of your nests, giving them a satisfying texture.
- Marshmallows: Melted for a gooey, sticky binding that holds the cereal together without overpowering flavor.
- Butter: Adds richness and helps with smooth melting of the marshmallows for easy mixing.
- Mini Chocolate Eggs: These festive candies sit snugly on top to provide sweet bursts of chocolate and a visual Easter theme.
- Optional Food Coloring: Adds a playful pastel tint to the marshmallow mixture for a more vibrant nest appearance.
Variations for Krispies Easter Egg Nests
One of the best things about Krispies Easter Egg Nests is how adaptable they are. Feel free to personalize this recipe to fit your flavor preferences or dietary needs—whether you want to add nuts, swap candies, or make vegan versions, it’s all easy and delicious!
- Peanut Butter Twist: Stir in some peanut butter with the melted marshmallows for a nutty, rich flavor.
- White Chocolate Base: Use white chocolate instead of marshmallows for a creamy texture and different sweetness.
- Vegan Substitute: Replace butter with coconut oil and use vegan marshmallows to accommodate plant-based diets.
- Add Dried Fruit: Mix in dried cranberries or raisins to add chewiness and a fruity contrast.
- Gluten-Free Version: Be sure to use gluten-free crispy rice cereal to keep these safe for gluten-sensitive guests.

How to Make Krispies Easter Egg Nests
Step 1: Melt Butter and Marshmallows
Begin by melting the butter in a large saucepan over low heat. Once melted, add the marshmallows and stir continuously until the mixture is smooth and fully melted. If desired, add a few drops of food coloring now to tint the marshmallow mixture in soft pastel shades.
Step 2: Combine with Crispy Rice Cereal
Remove the pan from heat and immediately fold in the crispy rice cereal. Stir gently but thoroughly to coat every piece of cereal with the marshmallow mixture, ensuring an even distribution for that perfect sticky texture.
Step 3: Shape the Nests
Using lightly buttered hands or a spoon, scoop out small portions of the cereal mix and shape them into round nest-like mounds on a parchment-lined baking tray. Create a shallow well in the center of each nest to hold your Easter eggs securely.
Step 4: Add the Mini Chocolate Eggs
While the nests are still warm and pliable, gently press 3 to 5 mini chocolate eggs into the center of each nest. This allows the eggs to stick firmly as the nests cool and set.
Step 5: Let Cool and Set
Allow the Krispies Easter Egg Nests to cool completely at room temperature or in the fridge until they are firm to the touch. Once set, they are ready to enjoy or package for gifting.
Pro Tips for Making Krispies Easter Egg Nests
- Use Fresh Marshmallows: Fresh, fluffy marshmallows melt more smoothly and ensure that your nests stay soft and pliable.
- Grease Your Hands: Lightly butter your hands before shaping nests to prevent sticking and create smooth edges.
- Don’t Overheat: Keep your marshmallow mixture on low heat to avoid burning or drying out for the best flavor and texture.
- Work Quickly: The mixture starts to harden as it cools, so shape your nests promptly to avoid cracking.
- Store Properly: Keep nests in an airtight container at room temperature for up to 3 days to maintain crispness.
How to Serve Krispies Easter Egg Nests
Garnishes
For a festive finishing touch, dust your nests with a little powdered sugar or edible glitter for extra sparkle. You can also add edible flowers or coconut flakes tinted green to mimic grass surrounding the nests.
Side Dishes
Serve your Krispies Easter Egg Nests alongside fresh fruit platters, whipped cream, or a light vanilla custard pudding for balanced sweetness during Easter brunch or dessert time.
Creative Ways to Present
Arrange nests on a large serving platter surrounded by pastel-colored cloth napkins or Easter grass to create an inviting centerpiece. For gifting, place them in clear cellophane bags tied with a colorful ribbon—it makes for a charming homemade present!
Make Ahead and Storage
Storing Leftovers
Store any leftover Krispies Easter Egg Nests in an airtight container at room temperature to keep the cereal crispy and the marshmallow binding soft but firm. Avoid storing in humid areas to prevent sogginess.
Freezing
You can freeze the nests by placing them on a baking sheet to freeze individually before packing them tightly in freezer bags or containers. Thaw them at room temperature before serving for best texture and flavor.
Reheating
If the nests have hardened, warm them gently in the microwave for 10–15 seconds to soften the marshmallows again without melting the eggs. Handle gently after warming to maintain nest shape.
FAQs
Can I use other cereals instead of crispy rice?
While crispy rice cereal is best for the classic crunch and structure, you can experiment with puffed wheat or cornflakes for different textures, but results may vary.
What kinds of eggs work best for the nests?
Mini chocolate eggs are ideal because they fit nicely in the nests and melt less quickly. Candy-coated or solid milk chocolate eggs both work well.
Are Krispies Easter Egg Nests suitable for vegans?
Not by default due to marshmallows and butter, but you can make vegan versions by using vegan marshmallows and plant-based butter or coconut oil.
How long do these nests last?
When stored in an airtight container at room temperature, Krispies Easter Egg Nests stay fresh for about 3 days before the texture begins to soften.
Can I add nuts or dried fruit?
Absolutely! Adding chopped nuts or dried fruit can give a nice twist to the texture and flavor, though it may change the traditional look of the nests.
Final Thoughts
Making Krispies Easter Egg Nests is a joyful, quick way to add fun and flavor to any Easter celebration. With its crispy texture, sweet marshmallow coating, and colorful chocolate eggs, this recipe is sure to become a favorite in your festive treat rotation. Give it a try, and watch everyone’s faces light up as they enjoy these charming little nests!
Related Posts
- How to Make Hidden Rainbow Cookies Perfectly
- 5 Easy Protein Yogurt Pudding Recipes to Try
- Easy No-Bake Cheesecake Jars Recipe Ideas
Krispies Easter Egg Nests
- Total Time: 15 minutes
- Yield: 12 nests 1x
- Diet: Gluten Free
Description
These Krispies Easter Egg Nests are a quick, fun, and delightful treat perfect for Easter celebrations. With a crispy rice cereal base bound by sweet, gooey marshmallows and topped with colorful mini chocolate eggs, they offer a charming presentation and a crunchy, sweet texture. Easy to make in under 20 minutes, customizable for dietary needs, and kid-friendly, these nests make a festive favorite for parties, family gatherings, or gifting.
Ingredients
Base Ingredients
- 4 cups crispy rice cereal (gluten-free if needed)
- 3 tablespoons butter
- 4 cups marshmallows
- Optional: a few drops of pastel food coloring
Toppings
- Mini chocolate eggs, 3 to 5 per nest
Instructions
- Melt Butter and Marshmallows: Begin by melting the butter in a large saucepan over low heat. Once melted, add the marshmallows and stir continuously until the mixture is smooth and fully melted. If desired, add a few drops of food coloring now to tint the marshmallow mixture in soft pastel shades.
- Combine with Crispy Rice Cereal: Remove the pan from heat and immediately fold in the crispy rice cereal. Stir gently but thoroughly to coat every piece of cereal with the marshmallow mixture, ensuring an even distribution for that perfect sticky texture.
- Shape the Nests: Using lightly buttered hands or a spoon, scoop out small portions of the cereal mix and shape them into round nest-like mounds on a parchment-lined baking tray. Create a shallow well in the center of each nest to hold your Easter eggs securely.
- Add the Mini Chocolate Eggs: While the nests are still warm and pliable, gently press 3 to 5 mini chocolate eggs into the center of each nest. This allows the eggs to stick firmly as the nests cool and set.
- Let Cool and Set: Allow the Krispies Easter Egg Nests to cool completely at room temperature or in the fridge until they are firm to the touch. Once set, they are ready to enjoy or package for gifting.
Notes
- Use fresh, fluffy marshmallows for smoother melting and soft nests.
- Lightly butter your hands before shaping nests to prevent sticking and to create smooth edges.
- Keep marshmallow mixture on low heat to avoid burning or drying out.
- Work quickly, as the mixture hardens as it cools, to avoid cracking nests.
- Store in an airtight container at room temperature for up to 3 days to maintain crispness.
- Prep Time: 10 minutes
- Cook Time: 5 minutes
- Category: Dessert
- Method: No-Bake
- Cuisine: American
Nutrition
- Serving Size: 1 nest
- Calories: 150
- Sugar: 15g
- Sodium: 90mg
- Fat: 5g
- Saturated Fat: 3g
- Unsaturated Fat: 1.5g
- Trans Fat: 0g
- Carbohydrates: 25g
- Fiber: 0.5g
- Protein: 1g
- Cholesterol: 10mg
Keywords: Easter, Krispies, Rice Cereal, Marshmallow Treats, Kids, Quick Dessert, Gluten Free