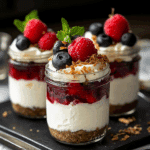
Easy No-Bake Cheesecake Jars Recipe Ideas

If you are looking for a delightful dessert that combines ease with elegance, these No-Bake Cheesecake Jars are exactly what you need. Perfect for quick desserts, parties, or anytime treats, this recipe delivers creamy, flavorful cheesecake in a convenient jar form without heating up your kitchen or spending hours in prep. With minimal ingredients and steps, you’ll have a delicious dessert ready in just minutes that everyone will love.
Why You’ll Love This Recipe
- Effortless prep: No baking means you can whip these up quickly without turning on the oven.
- Portable and individual: Jars are perfect for serving guests or taking on-the-go without mess.
- Customizable flavors: Easily adapt toppings or fillings to suit any taste or season.
- Delightful texture: Creamy cheesecake paired with crunchy crust creates a perfect bite.
- Make-ahead friendly: Prepare jars in advance for stress-free entertaining.
Ingredients You’ll Need
The beauty of No-Bake Cheesecake Jars lies in their simplicity. Each ingredient adds a unique texture or flavor that melds together for an irresistible dessert. From creamy cheese to buttery crust and fresh fruit toppings, this recipe relies on basic ingredients that bring maximum impact.
- Cream cheese: Provides the rich, creamy base that gives cheesecake its signature taste.
- Whipped cream: Lightens the filling for a fluffy, airy texture that melts in your mouth.
- Crushed graham crackers: Adds a classic crunchy crust at the bottom of each jar.
- Butter: Binds the crust ingredients together and adds a luscious richness.
- Sugar: Sweetens the cheesecake filling just enough without overpowering.
- Vanilla extract: Brings warmth and depth to the cheesecake flavor.
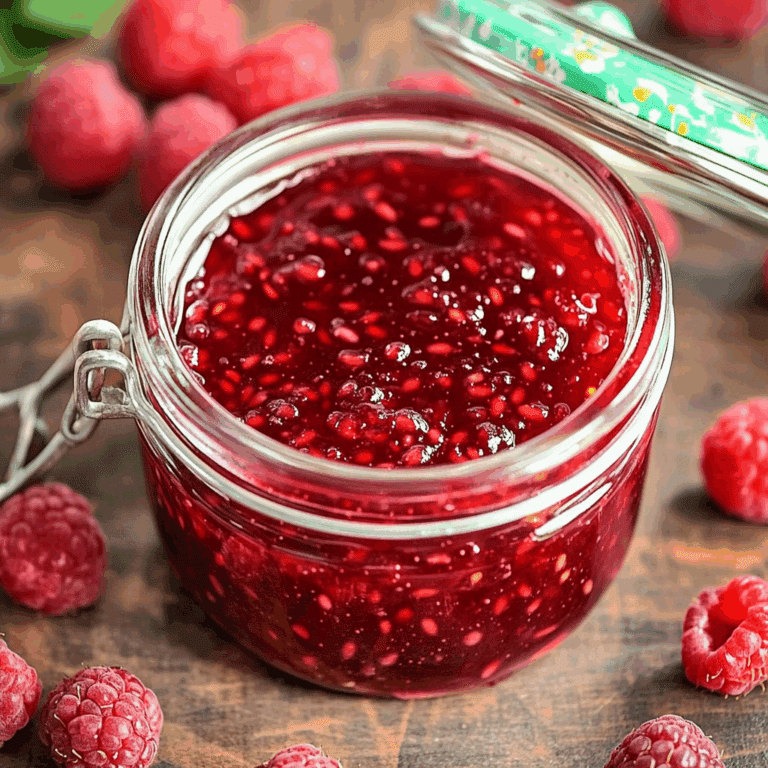
- Fresh fruit or fruit preserves: Adds pops of color and natural sweetness on top.
Variations for No-Bake Cheesecake Jars
One of the best parts about no-bake cheesecake jars is how versatile they are. Feel free to tailor the flavors and toppings to your preferences, whether you want something classic, fruity, chocolatey, or even vegan. The possibilities are endless and easy to customize based on what you have available or your dietary needs.
- Berry bliss: Layer mixed berries or raspberry preserves for a fresh and tangy twist.
- Chocolate lover’s: Add cocoa powder to the filling and top with chocolate chips or shavings.
- Tropical escape: Incorporate crushed pineapple and shredded coconut in layers for a vacation vibe.
- Nutty crunch: Sprinkle chopped pecans or almonds on top for added texture and flavor.
- Vegan version: Use vegan cream cheese, coconut cream, and plant-based butter to keep it dairy-free.

How to Make No-Bake Cheesecake Jars
Step 1: Prepare the crust
Start by melting the butter, then combine it with crushed graham crackers in a bowl until the crumbs are evenly moistened. Press this mixture firmly into the bottom of each jar to form the crust base.
Step 2: Make the cheesecake filling
Beat softened cream cheese with sugar and vanilla extract until smooth and creamy. Gently fold in the whipped cream to create a fluffy yet rich filling.
Step 3: Assemble the jars
Spoon or pipe the cheesecake filling over the crust in each jar, filling it almost to the top. Smooth the surface with a spatula or back of a spoon for a neat finish.
Step 4: Add toppings
Top the cheesecake layers with your chosen fruits, nuts, or drizzle of preserves. This not only adds flavor but makes the jars visually appealing and inviting.
Step 5: Chill before serving
Place the jars in the refrigerator for at least 2 hours (or overnight) to allow the filling to set firmly. This chilling step is crucial for the perfect sliceable texture later.
Pro Tips for Making No-Bake Cheesecake Jars
- Use room temperature cream cheese: This ensures the filling is smooth without lumps.
- Don’t overmix whipped cream: Fold gently to keep the airy texture intact.
- Press crust firmly: A compact base prevents crumbling when serving.
- Chill thoroughly: Proper refrigeration helps the layers set and flavors meld beautifully.
- Choose fresh toppings: The best garnish boosts taste and adds vibrant color.
How to Serve No-Bake Cheesecake Jars
Garnishes
Simple but eye-catching garnishes like fresh mint leaves, a dusting of powdered sugar, or a few chocolate curls make each jar feel special and inviting. Feel free to layer colorful fruits or sprinkle toasted nuts for extra flair.
Side Dishes
Pair your No-Bake Cheesecake Jars with light accompaniments such as fresh berries, a crisp fruit salad, or a mild coffee or tea. These sides complement the richness of the cheesecake without overwhelming it.
Creative Ways to Present
Use clear glass jars to showcase the beautiful layers of crust, filling, and topping. Tie a rustic ribbon around the jar’s neck for a charming gift or party favor. You can even add personalized tags for events and celebrations.
Make Ahead and Storage
Storing Leftovers
Keep leftover No-Bake Cheesecake Jars covered tightly with lids or plastic wrap in the refrigerator. They will stay fresh and delicious for up to 3 days, making them perfect for prepping in advance or enjoying as a treat later.
Freezing
You can freeze the jars for up to 1 month. To preserve texture, wrap each jar securely with plastic wrap and place in a freezer-safe container. Thaw in the refrigerator overnight before serving for best results.
Reheating
These no-bake desserts are best served chilled, so reheating is not recommended. Simply remove from the fridge and let them sit at room temperature for 10–15 minutes if needed before enjoying.
FAQs
Can I use regular cream instead of whipped cream?
Whipped cream is preferred because it adds lightness and airiness to the filling, but you could whip regular cream yourself or substitute with a light alternative for similar results.
How long do No-Bake Cheesecake Jars last in the fridge?
They typically stay fresh and safe to eat for about 3 days when stored in airtight containers in the refrigerator.
Can I make these jars dairy-free?
Absolutely! Use dairy-free cream cheese, whipped coconut cream, and plant-based butter alternatives to make a vegan-friendly version without sacrificing taste.
What is the best type of jar to use?
Small mason jars or any clear glass jars between 4 to 8 ounces work great, as they showcase the layers beautifully and are easy to handle.
Do I really have to chill the jars for 2 hours?
Chilling is essential to help the filling firm up and the flavors to meld, so try to chill for at least 2 hours, or ideally overnight for the tastiest texture.
Final Thoughts
No-Bake Cheesecake Jars are such a fun and delicious way to enjoy a classic dessert without fuss or mess. Ideal for any occasion or just a sweet craving, these jars bring creamy, dreamy cheesecake flavor right to your table with minimal effort. Give this recipe a try today, and watch how quickly it becomes a family favorite you’ll want to make again and again!
Related Posts
- Why Honey Bun Cake Is Your Next Favorite Treat
- Why Best Pumpkin Cheesecake Bars Will Delight You
- Why Best Cinnamon Roll Cake Will Delight You
No-Bake Cheesecake Jars
- Total Time: 2 hours 10 minutes
- Yield: 6 jars (4 to 8 ounces each) 1x
- Diet: Vegetarian
Description
No-Bake Cheesecake Jars offer a delicious, creamy cheesecake dessert that requires no baking, making it quick and easy to prepare. Served in individual jars, they are perfect for parties, on-the-go treats, or stress-free entertaining. With a buttery graham cracker crust, fluffy cream cheese filling, and customizable fresh fruit toppings, these jars combine convenience with elegance and delightful textures.
Ingredients
Crust
- 1 cup crushed graham crackers
- 4 tablespoons melted butter
Cheesecake Filling
- 8 ounces cream cheese, softened
- 1/4 cup sugar
- 1 teaspoon vanilla extract
- 3/4 cup whipped cream
Toppings
- Fresh fruit or fruit preserves (such as mixed berries, raspberry preserves, crushed pineapple, or shredded coconut)
- Optional: chopped nuts (pecans or almonds), chocolate chips or shavings
Instructions
- Prepare the crust: Melt the butter and combine it with crushed graham crackers in a bowl until the crumbs are evenly moistened. Press this mixture firmly into the bottom of each jar to form the crust base.
- Make the cheesecake filling: Beat softened cream cheese with sugar and vanilla extract until smooth and creamy. Gently fold in the whipped cream to create a fluffy yet rich filling.
- Assemble the jars: Spoon or pipe the cheesecake filling over the crust in each jar, filling it almost to the top. Smooth the surface with a spatula or back of a spoon for a neat finish.
- Add toppings: Top the cheesecake layers with your chosen fruits, nuts, or a drizzle of preserves to add flavor and create an attractive presentation.
- Chill before serving: Place the jars in the refrigerator for at least 2 hours or overnight to allow the filling to set firmly and develop a sliceable texture.
Notes
- Use room temperature cream cheese for a smooth filling without lumps.
- Fold whipped cream gently to maintain its airy texture and avoid overmixing.
- Press crust firmly to create a compact base that won’t crumble when serving.
- Chill the jars thoroughly to help the layers set and blend flavors beautifully.
- Choose fresh toppings for the best flavor and vibrant appearance.
- Prep Time: 10 minutes
- Cook Time: 0 minutes
- Category: Dessert
- Method: No-Bake
- Cuisine: American
Nutrition
- Serving Size: 1 jar (approx. 4 oz)
- Calories: 320
- Sugar: 20g
- Sodium: 150mg
- Fat: 22g
- Saturated Fat: 13g
- Unsaturated Fat: 7g
- Trans Fat: 0g
- Carbohydrates: 22g
- Fiber: 1g
- Protein: 4g
- Cholesterol: 60mg
Keywords: no-bake cheesecake, cheesecake jars, easy dessert, party dessert, individual desserts, creamy cheesecake, graham cracker crust, make-ahead dessert, portable dessert